EUROPHYT- Outbreaks Management and Consultation Tables
Sections "Management of outbreak notifications of a Member State" and "Consultation of outbreak notifications of all Member States" provide, in the form of tables, information on notifications.
The information displayed in each table can be amended and sorted by each user depending on their need (see Managing Table State). From each table, a set of functions is available for the user to search, view, export and/or manage notifications.
In these sections, the "Europhyt Outbreaks" banner is displayed.
![]() To display or hide banner, click on the "Hide/show banner" icon:
To display or hide banner, click on the "Hide/show banner" icon: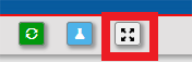
Tables available
By clicking on the icon "Management of all outbreak notifications", three different tables are available for notifications relating to a Member State:
- "Draft" table lists all notifications with the notification statuses "Draft" and "Init. Close";
- "All excluding Draft" table lists all notifications with the notification status "Validated", "Approved", "Valid. Close" and "Closed;
- "Historical" table lists all initial and subsequent versions of outbreak notifications. "Approved" and "Closed" are the two notification statuses that can be found in this table.
On opening the section, the table "Draft" is automatically displayed.
![]() You can change table by clicking on the "Notification(s) status" button showing the value "Draft" on the upper ribbon menu.
You can change table by clicking on the "Notification(s) status" button showing the value "Draft" on the upper ribbon menu.
![]() You can also select another table in the drop down menu:
You can also select another table in the drop down menu:

By clicking on the icon "Consultation of all approved outbreak notifications", a single table is available for notifications of all Member States.
The table lists all "Approved" and "Closed" outbreak notifications of all Member States in their latest approved version.
Managing table States
Original State
All tables have a default setting called "Original State" as indicated in the title above the table:
Each table can be amended as follows:
Change information (columns) displayed in the table:
![]() click on the vertical hamburger "Columns" icon
click on the vertical hamburger "Columns" icon in the top right hand corner of the table.
A list of 41 values is displayed: those appearing in the columns of the "Original State" table are pre- selected in the list.
![]() chose those values that you want to display in the table by selecting or de-selecting items
chose those values that you want to display in the table by selecting or de-selecting items
![]() click on the hamburger icon to hide the list
click on the hamburger icon to hide the list
The columns de-selected have disappeared from the table while values selected appear as a header of columns.
The columns are ordered in accordance with the order of the menu list:
Change the order of columns in the table
![]() left-click on the columns header and drag the column to the desired location.
left-click on the columns header and drag the column to the desired location.
Re-size the width of any column:
![]() left click on the right edge of the column header and drag it to the desired width.
left click on the right edge of the column header and drag it to the desired width.
Undo the re-sizing of one specific column:
![]() move the cursor of the mouse to the right hand side of the column title – a horizontal hamburger will appear
move the cursor of the mouse to the right hand side of the column title – a horizontal hamburger will appear
![]() click on it to show a drop down list. Click on "Autosize This Column"
click on it to show a drop down list. Click on "Autosize This Column"
![]() to undo the re-sizing of all the columns, select "Autosize All Columns"
to undo the re-sizing of all the columns, select "Autosize All Columns"
"Pin Left" or "Pin Right" a column:
![]() move the cursor of the mouse to the right hand side of the column title
move the cursor of the mouse to the right hand side of the column title
![]() click on the horizontal hamburger, then on "Pin Column" and select the preferred option:
click on the horizontal hamburger, then on "Pin Column" and select the preferred option:

- "Pin left" will move the column to left of the table and will "freeze" it so it always remains visible.
- This can be done to several columns
![]() click on “No Pin” to undo.
click on “No Pin” to undo.
Sort the list of notifications according to the values in one column:
![]() move the mouse cursor on the header of the column and click on its title - an ascending or descending arrow will appear next to the title:
move the mouse cursor on the header of the column and click on its title - an ascending or descending arrow will appear next to the title:

![]() click on "Refresh page" icon
click on "Refresh page" icon  to sort according to value
Filter data in one or several columns:
![]() click on the "toggle filter" button
click on the "toggle filter" button  in the ribbon above the table in order for the filter fields to appear below the table header
![]() enter in one or more columns, a value for the filter
enter in one or more columns, a value for the filter
![]() click on the "refresh page" button
click on the "refresh page" button  to implement the filters
Delete all the filters:
![]() use the "reset filters" button
use the "reset filters" button  in the ribbon above the table.
Define a new Table State
Changes introduced to the "Original State" of a table (see previous section) can be saved by the user:
![]() click on the "User toolbox" button and on "Save Current Table State"
click on the "User toolbox" button and on "Save Current Table State"

A pop-up window "Save Current Table State" appears:

![]() Type the name of this new Table State in the "File name" field - four options appear for the State table:
Type the name of this new Table State in the "File name" field - four options appear for the State table:
- Set as default State: if this option is left selected, the table will always show in this State
- Include filters: if the table state to be saved includes filters, then select this option too, otherwise the filters will not be saved (this should be reflected in the file name given to the state)
- Include Sorting Order: if the table state to be saved includes sorting orders, then select this option too, otherwise the sorting orders will not be saved (this should be reflected in the file name given to the state)
- Max Rows: the number of values per record shown in the Table State are 5 by default
 , but you can modify it in your saved Table State

![]() After you have set your preferences, click on "Save":
After you have set your preferences, click on "Save":

The new State shows in the list of "Table States" accessible with the icon  available in the ribbon above the table.
A star shows the table state set as default.
Another State can be implemented by selecting its name in the drop down list.
Change the default Table State
To change the default Table State:
![]() click on the "User Toolbox" button in the ribbon above the table and select "Save Current Table State"
click on the "User Toolbox" button in the ribbon above the table and select "Save Current Table State"

![]() click on the name of the table state to set as default and unselect the checkbox "Set as Default"
click on the name of the table state to set as default and unselect the checkbox "Set as Default"
![]() save and a message will appear asking: "Do you want to overwrite existing Table State?"
save and a message will appear asking: "Do you want to overwrite existing Table State?"
![]() click “Yes”
click “Yes”
 .
.
The Original State will automatically become the default Table State:

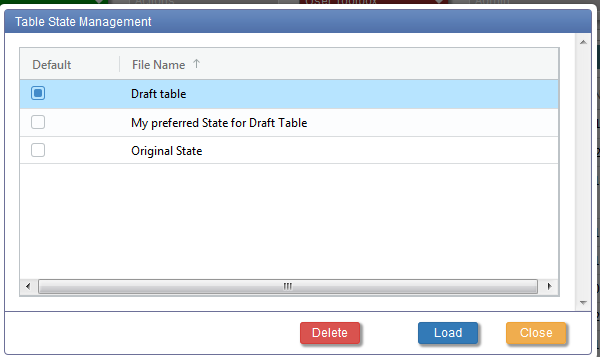
Delete a Table State
To delete a table State:
![]() click on the "User Toolbox" button in the ribbon above the table, and select "Table State Management":
click on the "User Toolbox" button in the ribbon above the table, and select "Table State Management":

![]() tick the checkbox corresponding to the Table State to be deleted and click on the delete button:
tick the checkbox corresponding to the Table State to be deleted and click on the delete button:
View EPPO Export
From the sections “Management of outbreak notifications of a Member State" and "Consultation of outbreak notifications of all Member States” you can view the notification information to be sent to EPPO:
![]() select first the notification that you wish consult.
select first the notification that you wish consult.
This will activate the “Actions” button:
![]() click on “Actions” to open the dropdown menu
click on “Actions” to open the dropdown menu
![]() select “View EPPO Export” from the list
select “View EPPO Export” from the list

A pop up window will appear showing the information to be sent to EPPO:

View Attachments
From “Management of outbreak notifications of a Member State" and "Consultation of outbreak notifications of all Member States” you can also view the attachment(s) linked to the notifications. The procedure is similar to one described before:
![]() select first the notification that you wish to manage or consult.
select first the notification that you wish to manage or consult.
This will activate the “Actions” button:
![]() click on “Actions” to open the dropdown menu
click on “Actions” to open the dropdown menu
![]() select “View Attachments” from the list:
select “View Attachments” from the list:

A pop up window will appear showing the attachments and, from there, you have also the option to download them:
